Evolution of a Get Endpoint
My work project started pretty simple: there was a simple GetXyz endpoint that just looked up the xyz record in the database by a unique key & returned it.
How complicated could it be?
It was a straightforward generalization of an old GetAbc functionality, it was really only used by oncall engineers through an admin console, it shouldn’t have been too big of a deal.
Ok, but then it outgrew its original datastore, so a separate service had to be created.
We thought about migrating clients, but at the time it seemed faster to just implement once on our side & have clients continue calling us; essentially encapsulating the separate service as an implementation detail.
But as part of the traffic swing, we figured it should support either the local or the remote read path.
loan trickery
I have this “American Express Blueprint Business Loan” product to have a line of credit for the rentals if I’m ever in a pinch.
They allow up to $21,700 with this very easy application process, you basically just slide a slider to the amount needed & select between 6, 12, 18, 24 months:
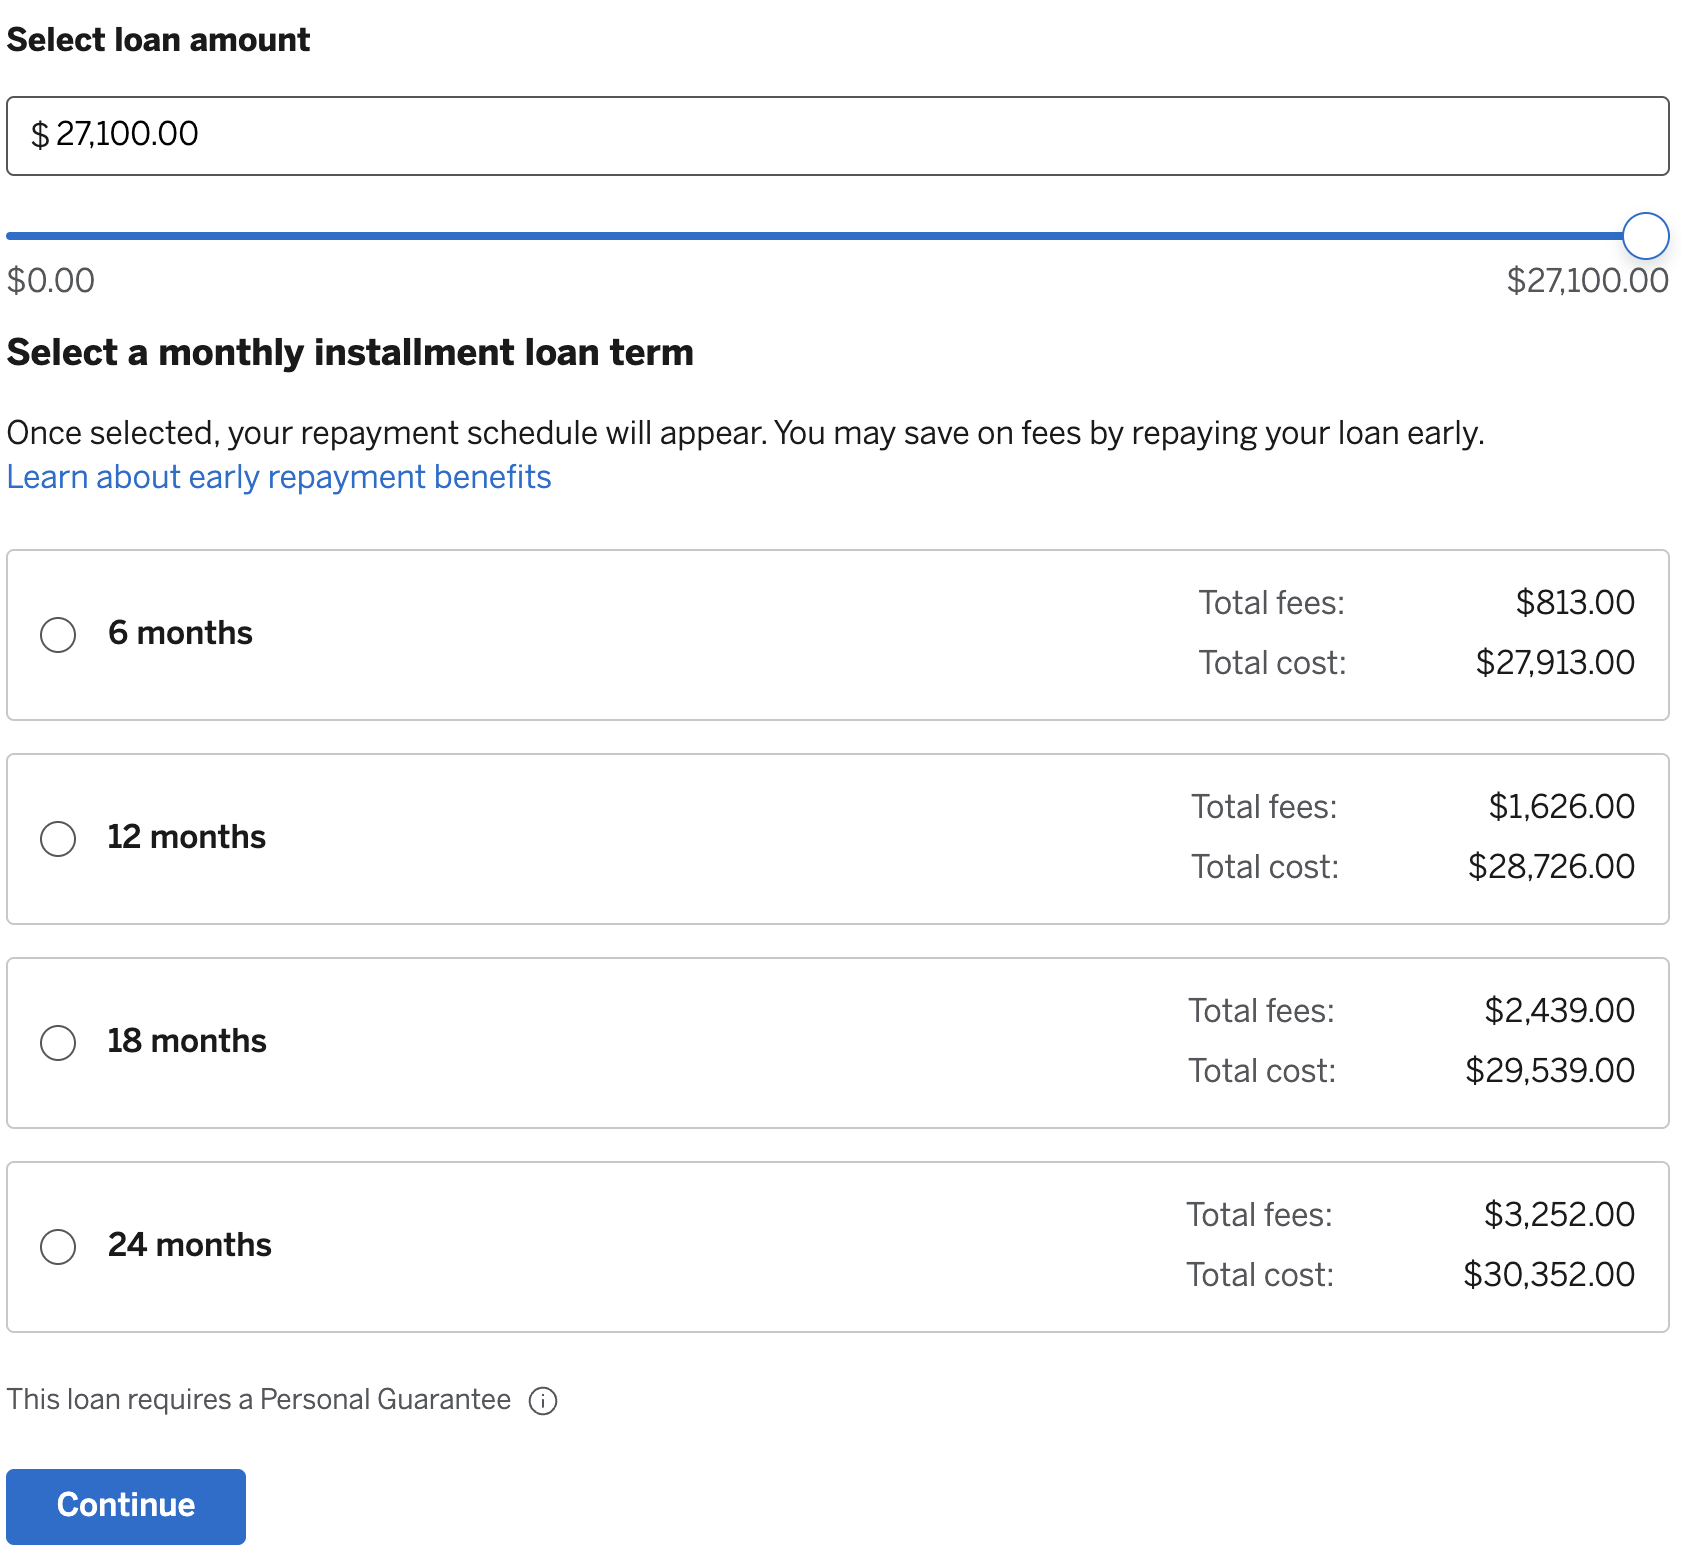
This shows a schedule like this:
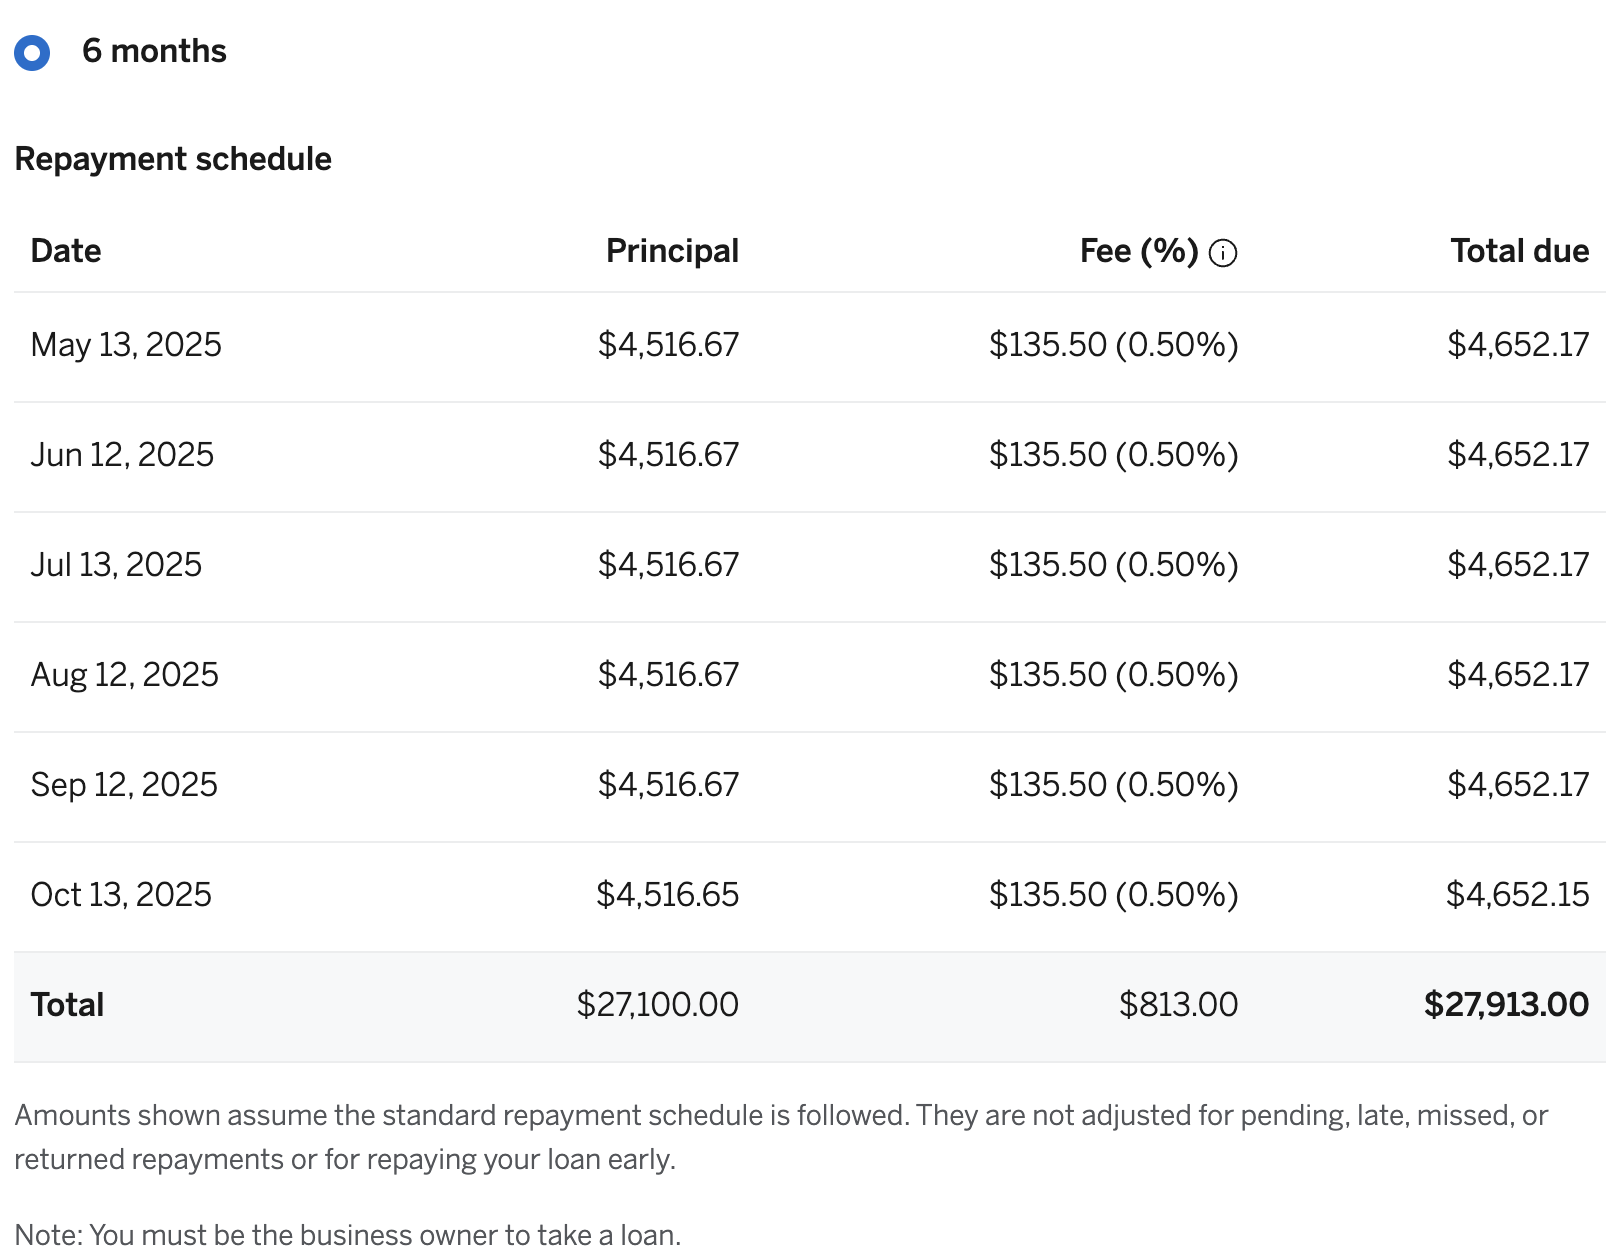
Looking at this, there’s a lot of temptation to think
38 and Grateful
It’s been a while since I’ve written an update – 2.5y! – and a long time since I wrote very frequently. On top of all the crazy ways the world has changed in the last five years, a bunch has changed for me personally in the last five years as well, along a bunch of different axes.
I think part of the reason it’s been hard to post is wanting to avoid coming across as bragging about the high points of this journey and also not really wanting to admit some of the low points, but I feel I’ve had a lot on my mind that doesn’t really make sense in blog form without the greater context; I’ve decided that I’d rather just share a lot of what’s been going on in the hopes that some part of it is relevant to someone out there or gives them some fortitude for whatever low spot they’re going through or can learn something from it.
Transacter and Intent/Result
At SQ, we had a family of Transacter interfaces:
public interface Transacter {
  void transaction(Function<Session, Void> session);

  public interface Session {
    DSLContext dsl();
  }
}
where DSLContext is a jOOQ concept & is the handle for doing work against the database.
Then this would be used in some class like
public class KvDao {
  @Inject Transacter transacter;

  void put(String ns, String k, String v) {
    transacter.transaction(session -> {
        KvRecord record = new KvRecord(ns, k, v);
        session.dsl().insertInto(KV).set(record).execute();
    });
  }
}
The parameters ns, k, and v are shorthand for namespace, key, and value, respectively.
We’ll show how these might be used together shortly!
hype channels
When I was managing a small team, one of the coolest protips I came across was the idea of a “hype channel”. This builds on the idea of a “hype doc” by changing the medium: instead of writing into a document, you write blurbs on your own private Slack channel.
I’m not sure whether this would help anyone but me, but maybe it’ll help someone else drowning in Chrome tabs?
interceptors
INTERCEPTORS ARE SO COOL!
Sometimes you need some “generic rails” that are still highly adaptable to other uses. This is the basic problem solved by the Interceptor pattern.
I really love the way OkHttp does interceptors for the generic rails of making HTTP calls, so I wanted to walk through a case study of why an interceptor might be useful and then try to synthesize some lessons & a minimal example of the pattern.
Hugo
I’ve decided to migrate the blog to Hugo, as you might have noticed from the new look.
This is gonna be a pretty big project and I’m probably going to be at it a while. I did keep a copy of the old blog at blog.jekyll but it seems the formatting is already broken there :-(
feeds justification
I realized I’ve left out a major part from my sequence of previous feed-related posts: a justification for why we should bother with a separate feed_sync_id.
So let’s give it a shot!
The fundamental problem is:
AUTO_INCREMENTids are assigned in insertion order, but become visible to other threads in commit order.
To see how this causes a problem, consider the interactions and visibilities between three transactions to the same database:
t0: TRX0: BEGIN; INSERT INTO kv (ns, k, v) VALUES ("-", "k0", "v0"); COMMIT;
t1: TRX1: BEGIN; INSERT INTO kv (ns, k, v) VALUES ("-", "k1", "v1");
t2: TRX2: BEGIN; INSERT INTO kv (ns, k, v) VALUES ("-", "k2", "v2");
t3: TRX0: SELECT MAX(id) FROM kv;
t4: TRX2: COMMIT;
t5: TRX0: SELECT MAX(id) FROM kv;
t6: TRX1: COMMIT;
t7: TRX0: SELECT MAX(id) FROM kv;
Here, we have two transactions that both insert a new kv record.
The database has to assign an id value to each of those records, because we might be creating other associations to those records in our application code.
But other threads – TRX0 in this case – shouldn’t be able to see those records until we COMMIT, and so indeed the SELECT at t=t3 might return 1.
macos log command
My work laptop has been randomly shutting itself off. I came across this stackoverflow post, it said to run
log show \
  --predicate 'eventMessage contains "Previous shutdown cause"' \
  --last 24h
which, for me, returns
risksys  ➜ log show --predicate 'eventMessage contains "Previous shutdown cause"' --last 24h
Filtering the log data using "composedMessage CONTAINS "Previous shutdown cause""
Skipping info and debug messages, pass --info and/or --debug to include.
Timestamp                       Thread     Type        Activity             PID    TTL
2019-05-23 11:29:01.874486-0700 0xaf       Default     0x0                  0      0    kernel: (AppleSMC) Previous shutdown cause: -128
2019-05-23 11:44:49.786722-0700 0xaf       Default     0x0                  0      0    kernel: (AppleSMC) Previous shutdown cause: -128
--------------------------------------------------------------------------------------------------------------------
Log      - Default:          2, Info:                0, Debug:             0, Error:          0, Fault:          0
Activity - Create:           0, Transition:          0, Actions:           0
This, combined with these MacOS Shutdown Causes paints a pretty bleak picture: I’ve got RAM issues :-(
absolutely minimal OLTP to OLAP pipeline
Suppose we have some data in a production OLTP database, and we need to send it to some OLAP database. This post describes one of the simplest approaches, and how to make it productional enough to rely on.
For every table t, we need to:
- introduce a new field,
updated_at - introduce a new index on that field, so we can get the records that changed after a certain
updated_at.
For example,