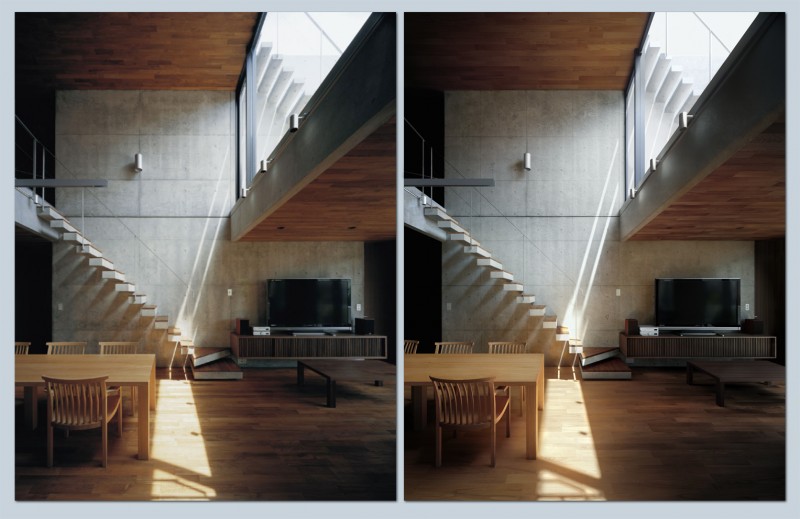


The first image is a comparison between the photo and my render. It’s not hard to figure out which is which side by side, but independently, it holds up nicely. The second image is a high–res image of my render. I’ve always wanted to do a Render Vs. Photo of an architectural piece, and after many months of working on it in my spare time, I have finally called it finish and time to move on. I wanted to work on this project mainly to familiarize myself with iRay and see how it did at interiors, since it is advertized as an architectural renderer. This project, admittedly, is a beast for any renderer because it is lit mainly by indirect light. This is hard for any renderer to resolve. After 24 hours of waiting for the render on a gtx 580, I needed to kill it and clean up a lot of fireflies. Make sure to click on the image to see it in all of it’s hires glory 🙂 Enjoy!
You can find the full series of the Foo House on their website located here:
http://www.kurosakisatoshi.com/english/architecture/2007/foo/index.html
Winner of the 3DTotal Excellence Award

This is amazing! It looks so real! Congrats!
This is one of the most realistic interiors I’ve seen! Congrats! Can you give some stats like how long it took to render/work on. How you made it so realist? Thanks!
I replied to this question in the post made by James below.
Amazing Render. What did you use to render with?
I used iRay. It is mental images real time path tracer. It is able to be so fast because it it optimized to run on the gpu. However if your scene doesn’t fit in the memory of your gpu, then it will kick it to the cpu-which is still quite a bit faster than regular ole Mental Ray.
Looks great, Jonathan! How many hours do think this took you over the last few months? Or a better question is how long do you think it would take you if you did it again?
Hey James, thanks! This was my baby so I nurtured it way too much. That being said the breakdown of times were something like:
I started this back in February, just for time reference.
perspective matching: 10 hours. I took an embarrassingly long amount of time on this. Mainly because I wanted it to be perfect, but also because it was so hard for me to try and match the focal length without having any other data besides a couple pictures.
modeling: 32 hours. I had to do a lot of modeling of things that are outside of the the camera to cast accurate shadows and reflections. I also had to do a lot of tweaks when I realized my perspective didn’t match.
materials/texture: 40 hours
Lighting: 16 hours
Color correcting: 12 hours – the renderer wasn’t calculating light bounce correctly in some areas so some darkening and brightening were requires.
Experimenting and trying to find methods that work: 15 hours
Total time: about 125 hours give or take 10 hours
If I were to do this again, or something very similar, I could probably do it in 60-70 hours. I think a lot of the time suck was leaving it for a few days or weeks and then coming back to it and trying to remember where I was at and what I was thinking.
hi..
its nice….the only change is those blurriness of that shadows of table…if it were a little hard then it was perfect match….
awesome job man………keep doing great work….:)
Wow, this is absolutely unreal!
Do you mind if we feature this in a blog post of “photos vs renders” we are running?
Look forward to hearing from you, keep up the awesome work!
You can absolutely use it! Thanks for checking in, I really appreciate it. Post the link here, when you are done. I’d love to check it out 🙂